Sunday, July 2, 2017

Sprinkles Make Me Smile

WHAT A WEEK!  I have spent a number of hours working on small projects in Photoshop and I couldn't be more pleased with this fact.  In one week I have learned SO MUCH!  With just using YouTube and a "Photoshop for Dummies" book I was able to break down that thick wall of self doubt that I had built up over the years.  I'm going to be able to check that goal off my list here real soon.

For a long while now I have wanted to use my original artwork to make small items such as greeting cards, magnets and stickers that sell easily and bring in a steady stream of monthly income.  Yes, selling an original painting for $200-$500 is much more exciting than selling a $5 greeting card with that same image, but if I sell 100 of those greeting cards in a month.... Well, you do the math.

Yesterday, I turned my attention to making a nice sticker sheet that featured all my yummy cupcake sketches that I did recently.  I made a template for the 3 sizes of stickers, 1.5 x 2.066, (full) 1.5 x 1.033 (half) and 1.5 x .5165 (quarter).  Now I don't really know that much about this sticker business yet, and have found what appears to be a great resource that I will be going through this coming week but I thought I would share the link here if you also are curious like I am on the ins and outs of sticker making.  http://blog.nelizabeth.com/2017/2/11/how-to-make-planner-stickers-to-sell-on-etsy

If you are interested in downloading this particular sticker collection, then please check out my Etsy Store.  The cost is $3 for the download and then you can print as many of the stickers as you want as long as they are just for your personal use.

JulieTownsendStudio Etsy Store-You Take the Cake Stickers


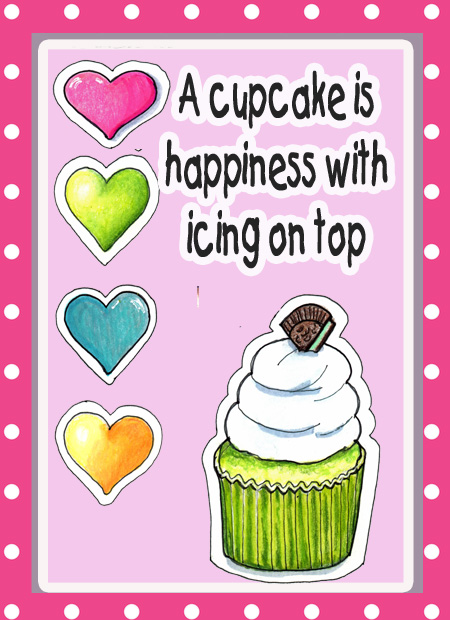
Here is a close up of several of the cupcake designs that I came up with.  They are all fun and bright and were so much fun to design. For the sketches I used my Prismacolor Pencils, my Tombow markers and black ink.  I outlined each image with a white border which I think results in a sticker on a sticker look.  At this time, I'm really liking how that looks.  It gives the image a "Pop" effect.


Fonts are extremely important to the overall design when you want to include a cute message.  Two fonts that I fell in love with this week, during my many hours of working on Photoshop projects are Catchup and KG Summersunshine.  I will certainly be adding both to my list of favorite fonts that I keep in my creative journal.  I keep the list because I have difficulty remember all those silly names and would have to waste too much time scrolling up and down the list of hundreds of fonts trying to remember their names.  I'm getting old so you have to cut me a break.

Catchup is already on my default font list on my computer but I guess I have failed to really see it.  It is fun and yet not too difficult to read.  I love how it looks on my most recent sticker sheet.


 The next font I used this week was one I actually downloaded from the website "Dafont.com".  My first font download by the way.  I was looking for a block font that I could really doctor up in Photoshop and this one turned out to be perfect.   This eye catching block font is called
Kg summersunshine  If you would like to download it yourself than here is the link at Dafont.com.  Here is the example of the flyer I made for a co-op gallery that I belong to in the heart of the Las Vegas Arts District.


Friday, June 30, 2017

It is Getting a Wee Bit Sticky Around Here

Colored Pencil sketch I did- Pink Peony
A really big part of developing creativity in your life is to surround yourself with pretty things that make you happy.  I think that is why planner stickers have become so popular.  Rather than looking at the traditional black and white squares of a calendar covered with ink scribbles that note boring things such as doctor appointments, haircuts and PTA meetings we can brighten up and decorate our days with easy to use stickers that are colorful and beautiful.

The other day I was just surfing the web for handmade planner stickers and as I scrolled through the hundreds of images, it dawned on me that these stickers are so popular because it is just like "Scrapbooking each day of your life".  I get it even though I don't have a planner because I have that same desire to keep an artistic journal of each of my days.  A desire unfortunately doesn't translate into reality and I'm pretty much a failure at keeping that up on a daily basis.  I have resorted to more often than not photocopying my sketches and using adhesive to attach the image to each page.  I think decorate around the image and make personal notes.  Is that cheating?  I don't think so.
My Artistic Journal

I love decorated and colorful pages but that does take a lot of work to draw on each page of my journal and so the ability to decorate your calendar with cute stickers does appeal to me.  What is the ultimate goal for me is to use my own artwork on easy to use stickers that I can just print out.

My own sticker sheet along side Victoria and Wild Apple's stickers


This week I have made a real concerted effort to teach myself to use and learn Photoshop.  My brain is still hurting after such a workout!  In reality, I'm actually pretty excited about my progress.  This is something I have wanted to learn for years.  I've made a couple of my own sticker sheets and some nice marketing flyers for the Art House gallery.  That is not bad for an old lady that needed to learn some new tricks.  While my sticker sheets may not be as refined as most that I saw available for sale on the internet, I am confident that very soon I will get there.

Speaking of great stickers, I downloaded this adorably cute succulent stickers from my good friend Victoria Thatcher and her website - victoriathatcher.com/
Check out her amazing work and the best part....IT IS ALL FREE! Thank you Victoria for sharing such sticker beauty with the world.


Yesterday, I also got these cute "Buy Art" stickers free from Wild Apple.  They are SO STINKING CUTE!  Here is a picture of my "Poultry in Motion", Buy Art and Victoria Thatcher's succulent stickers.  All of Victoria's stickers are free to download and I would be happy to email you the link to my chicken stickers if you message me.  


Wednesday, June 28, 2017

Old Dogs Can Learn New Photoshop Tricks


Life Began in a Garden
So this week my creative side has been very busy learning how to do just a few new things in Photoshop. Since I am teaching myself, both the student and the teacher are just a little bit on the slow side.  I just keep reminding myself that "Slow and Steady" wins the race!
I have really wanted to get into making stickers from my artwork for quite some time now and now I feel like I am actually making some progress. Here are two separate sticker sheets that I put together using Photoshop Elements.  This is practice mind you and I'm sure with a little more effort and learning, I can make a 
I'm so happy about this that I decided that I would share both printable files with you below. Not too bad for my first go around and I'm sure I will make better stickers as I learn the ins and outs of the market. In the mean time, I'm just so happy that I have so many supportive people in my life that keep me wanting to continue to make more art.  All I ask is that if you print these out that you let me know by leaving a comment below.  I would love to hear from you.  Any suggestions or requests are also greatly appreciated.  I will be offering many more sticker designs from my Etsy Store soon.  
Poultry in Motion

Check me out on my website at JulieTownsendStudio.com or on my Etsy Store at https://www.etsy.com/shop/JulieTownsendStudio

Tuesday, May 23, 2017

Handmade With Lots of LOVE

Who loves receiving handmade gifts?  In this day and age, it seems that getting a handmade gift is a rare event but I think the effort spent speaks volumes.

As long as I can really remember, I have loved making homemade gifts for people.  As I child I loved to embroidery and would make dishtowels and pillows and now these days I pick up a pencils or paintbrushes over sewing needles.  I would paint my own stationary designs and make my own clothing.  I'm blessed that I learned to sew and that I could draw and paint.  It sure made gift giving easier and less expensive over the years.

Today, I am invited to a dear friends retirement party.  She has spent almost 20 years serving the community on our local police force.  I know she has looked forward to this day for a long time and I'm sure her family will rest a bit easier knowing she is no longer out there in harms way.  I so appreciate her service and I know that in the past few years it has become increasingly difficult to work in the law enforcement profession. I can't imagine the stress involved to put on that uniform each day.   Now she can just focus on her family, her faith, some gardening and maybe she and I can even plan a little road trip.

I decided I was going to put my newly learned Photoshop skills to the test and create her a retirement card from my artwork.  I decided this bee and daisy sketch would be perfect.  I added some digital paper for the background border and then added text.  Maybe I could have thought of something more clever to write but this is what I came up with in the small space afforded me.


Now, I also decided that I would paint her a cowbell.  I know maybe she isn't into cowbells or mice but I'll just have to take my chances with that I guess.   I decided to paint a little mouse climbing a dandelion stem headed upward towards the prize.  It makes me think of this scripture in Philippians 3:14 "I press on toward the goal for the prize of the upward call of God in Christ Jesus."

As a child, I remember being told to make a wish just before I blew as hard as I could to send each little feathery seed pod off in the wind.  Reaching retirement is like having those wishes come true.  I pray she will be blessed in this new phase of her life and I really hope she likes her cowbell.

I would LOVE to hear from you if you have recently used your skills to make a handmade gift.  If you send me a picture and the details I might feature it here on my blog and Facebook page.  Just send me a message and let me know about it.

You can check out more of my artwork on my website at JulieTownsendStudio.com


Monday, May 22, 2017

Hanging around for years


I LOVE ANYTHING THAT IS OLD.  I always have.  Even as a small child I would walk around the very old parts of the cemetery just to look at all the old grave stones.  So naturally I would want to decorate my home with old pieces collected here and there.  I guess you would call that decorating in either Rustic, Primitive or Country.  
It may have been as long as 15 years ago I noticed a listing on Ebay for these two E. W. Townsend Sons catalogs dated 1935 & 1938.  The oldest catalog is actually just in black and white and I purchased it first.  When I saw the 1938 catalog with it's juicy red strawberries and bright green stems I knew I had to have that one also.  Since my last name is Townsend and I love the red and green color theme in my kitchen and dining room, I decided to buy them and have them matted and framed.  They have been hanging in my dining room ever since.  I'm hoping they will be something that I can pass on to my grandchildren since I have plenty of them that also share that name.

Another item, among many that hang on the wall is my Nevada Ghost Town Map.  I bought this map, if my memory serves me correctly in the old ghost town of Johnnie.  Since Brad and I absolutely love exploring the desert, this map was perfect.  I have always had a bucket list goal of visiting every ghost town in Nevada.  There are a LOT of ghost towns in Nevada and so this is a really large map.  I acquired this really large poster frame that the map would fit in and I knew I wanted to display it.  Many may disagree, but I decided to lightly burn the edges of the map to make it appear older and give it some interest.  I have it attached on top of a piece of black matte board rather than behind it.  I feel it helps identify the fact that it is a map and the burnt edges gives it character and interest.  After all these years, I still LOVE it!

Here are just a few of my favorite Ghost Town Photos we have taken over the years while exploring Nevada and the neighboring states.  You don't have to go to a museum here in Nevada because there are little bits of history just lying around all over the place.


Sunday, May 21, 2017

Step Away from the Green Sponge Paint

I've Been Dreaming of the Perfect Bathtub
I am really disappointed in the fact that I haven't written a creative blog for sometime.  When I started this blog I had made a commitment to myself to post here at a minimum of once a week.  A month has passed and here I am silent as a church mouse.  

It isn't because I haven't been creative during the time.  On the contrary, there has hardly a day gone by that I'm not creating some sort of art or learning Photoshop or thinking about marketing my art.  I have another blog for that activity.  No, this blog was to motivate me to step up my game here in my home and with my family.  

I've never been much of a craft person, but I do absolutely love country, rustic or primitive decorating.  That can be a challenge when you live in a large urban area and there no agriculture around.   Thankfully, we do have a Hobby Lobby now and they have plenty of adorable decorations to add to my collection.  

Yuck!
This past fall, the last child at home flew the coup.  With that event, comes the pressure to finally tackle those really big projects that having children in the home discourage.  So Brad and I made the decision to begin remodeling our main bathroom.  I should clarify this and say Brad was more like a hostage to my zeal to finally in my life have that amazing, as deep as I can get bathtub I have always dreamed of, the bronze fixtures, granite counter top and beautiful travertine walls and floor.

Tearing out the one piece tub
We took it down to the 2 x 4 studs, ripped out plumbing and tile.  Pretty much every square inch will be impacted and nothing there will be remaining.  As the old saying goes, "No PAIN, No GAIN!"  This mantra expresses perfectly the remodeling process as well as an effective exercise routine.

Even mopping the rest of the house seems like an effort in futility so to say I've been on the top of my game creative wise would not be true.  I've just been struggling with keeping the chaos organized and the drama to a minimum.  I FAILED!

Paint Swatches on Green Sponge Paint
We are now approaching the stage of remodeling project where I can begin to think about being creative.  I'm considering the paint colors and the accessories and little touches that will make this area pop with my personality.  I am SO ready to be rid of this 90's green sponge paint.  How did I ever think that was a good idea.  

New Travertine Shower
I've been in love with Teal and Brown for quite sometime now and I really want to make that the color theme.  The bathroom is really small so I'm planning on only painting one accent wall with the largest color sample.  The rest of the walls will be painting with a nice neutral beige to tone down all that browns of the stone floor and vanity top.  

Granite for the vanity top
I know that this particular color scheme just screams out Ocean or Beach decorations, but I'm not letting that hinder me here.  I'm thinking more in the line of flower gardens,  birds, nests with eggs and feathers.  I've already started gathering ideas for creating my own artwork to decorate with and will be blogging about this whole process so please consider following me as I attempt to transform this overused and worn out bathroom into a place that I can truly enjoy.  I had better start stocking up on bubble bath and candles.

Here are some small bird paintings I have done in the past and might try to either recreate or utilize them along with some purchased decorations.  As you can see two of them are on cowbells but I could repaint them on small canvases.  The center artwork is a colored pencil drawing I did last year.  


Wednesday, April 12, 2017

My Carrots Hanging in the Wind

So with my last blog I had written about how I had come across what I thought was a really cute idea for an Easter decoration.  It was so cute  that I decided I was going to try for myself.  
Several weeks ago I had purchased this very large rabbit from a Ross Dress for Less Store to use as part of my entryway spring display.  A can of Kono Brown  Glossy spray paint was all that was needed to him transformed him into the largest chocolate bunny I've ever seen.  He REALLY looks like he made of solid chocolate now.  This was so simple and yet so adorable, I decided to spray paint a couple of wooden eggs I had stowed away in the studio and give them a simple painted design.  
I then got the creative idea that I needed to add a few carrots to complete my decorations.  I looked around at Michaels and Walmart and not a fake vegetable on the shelf to be found.  I decided would take matters into my own hands and get MESSY with some paper mache!  
Supplies
I gathered up all the necessary supplies for my project: 
Sticks from my tree in my front yard 
Tin Foil
Newspaper
Flour
Greenery
Floral tape
The four sticks I had gathered had to be broken down into the correct size.  I wanted fairly large carrots so I tried to keep the straightest portions and yet it really didn't have to be perfect.  Using the floral tape I attached 2 or 3 frowns of greenery to each of the 4 sticks.
Sizing up my sticks and greenery
The next step was to take the tin foil and shape it around the stick in a form of a carrot.  Wider at the top tapering down to a slimmer pointed end.
When I had all four carrots shaped out of the tin foil I then turned my attention to mixing the flour and water paste.  It has probably been since Mr. Drinkard's Jr. High art class that I have used paper mache.  I have a memory of making masks or animals or something but that was MANY years ago. 
 I first tried one cup flour and one cup of water but that seemed much too think.  I ended up with 1 1/2 cups water to get the consistency that I remembered. I cut my paper into thin strips and then plunged into the really messy part.  The strips of paper must be well coated with the flour paste.  I used my fingers to pull the extra paste off before I then applied the sticky paper to my tin foil carrot.  Working from top to bottom trying to make sure each piece of paper is well attached.
When I managed to get all 4 carrots finished I then took them outside and hung them up in my tree to dry.  
The following day I decided that another coat of paper mache was necessary and so I repeated the process for each carrot.  I probably could have added several more coats to smooth out some of the more bumpy areas but I was getting pretty tired of all the mess I was making in my kitchen.  Two layers was going to have to be sufficient.
The final step was to paint them with orange paint and apply a coat of spray varnish. 
As usually you can see that I have been a rather busy artist this week.  I gathered up a number of items that all needed a coat of varnish applied.  This actually included 3 cowbells and 2 small cow paintings that I didn't remember about until after I had taken this picture.
Here you can see my carrots hanging out to dry for the last time.  The varnish really takes very little time to dry but because they were wet all over, hanging was really the best drying option.
All in all I like my end results and am happy that I decided to take the time to make my own decorations.  Even though the photo is just a little bit dark here you can see just how lovely all the pieces go together.